Q&A

How to Transfer or Email Big Files for Your Book

If you are developing an image-heavy book and need to transfer a large number of photo or graphic files to me, especially tiff or psd (Photoshop) files, you will likely find that attaching them to an email will not be sufficient. Or you can attach them to an email, but only one by one (if you have more than a handful of images, please don’t send them one by one!) Here are fives ways to potentially get a folder of big files to me, for me to provide an estimate or for me to begin your book design.

Use a free file transfer service

There are various free file transfer services (usually they become “un-free” if your files are too big) and my favourite just due to easy of use is WeTransfer. All you need is your files, my email address and your email address. You should not have to create a username and password to use WeTransfer. WeTransfer is good for a “one-and-done” transfer, if you will be sending all the files all at once.

Ask me for a Dropbox folder link

The transfer method I use the most is Dropbox. I can email you a link to a folder that only you and I will have access to. Once you have that link, it may be as easy as clicking that link and pulling the files from your computer into your web browser and letting them upload. Or, you may need to create a Dropbox account (using your email address) if you don’t have one, but this is a straightforward process that just takes a minute or two. We can use the same folder link again if you need to add more images, or if I need to send you a pdf proof that is too large to attach to an email.

Send them via Google Drive

If you have a gmail account or are more familiar with Google than with Dropbox, you can use Google Drive to share files. This can be done for free up to a certain file size.

Get your photographer to transfer the files

If you are working with a professional photographer, the photographer will know how to transfer big files digitally. Connect your photographer directly with me and they can send me a download link.

Send them via mail on a hard drive or pen drive

Although sending your files via hard drive or pen drive is slow, it is still sometimes the most reliable and cos-effective way to send enormous, heavy graphics for your book. This is of course more efficient if you live in the USA like I do, but even when I lived in Europe, I had an American client send me his files this way. If you would like to use this method, just ask me for my postal address. 🇺🇸


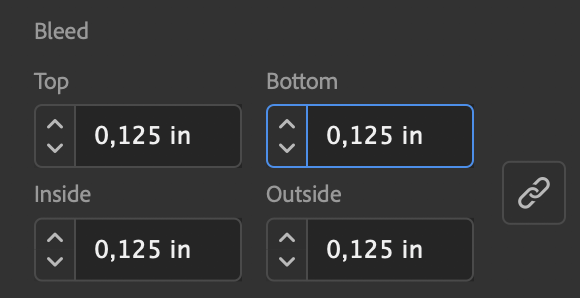
Self-publishing an image- or graphic-heavy book is a significant endeavour. If you are still at the research and conceptualisation stage of your book, or don’t have all the images ready yet, I recommend booking a brainstorming call to discuss how to create your content and collect your files/graphics efficiently. If your book has lots of tables, charts and graphics, here are some pointers for achieving a professional look and feel to your book. If you are still collecting images and want to make sure you find images that are print quality (as some images are too fuzzy-looking when printed), try searching on these websites.

What Does the Term “Bleed” Refer to in Book Design and Layout?

A term that often comes up when I am checking a book file someone else has created, or preparing to design a book interior or book cover, is “bleed”. Does your book bleed, or does it not? A printer may ask you if your book bleeds or not when quoting you a printing price, because this influences how much paper the printer needs to print your book. If your book should bleed but does not, your printer may reject the file, or the final product may not look the way you are expecting.

Bleed is an extra 0.125 inch or 0.3 cm area around all edges of the pages or cover of your book. Bleed is needed on any printed document that has any text or graphic elements that should go off the edge of the page or right up to the edge of the page. Basically, documents that have bleed print on oversized paper, and are later cut down to the right final size. The artwork “bleeds” off the edge of the page, hence the term.

For example, if a book is 6x9 inches, a book file that should be 6x9 inches at final size but has bleed is actually 6.25x9.25 inches, and then cut down to be 6x9.

What follows are two examples of book spreads that do not have bleed. That is, there are no graphics or images that go off the edge of the page. The solid yellow line indicates the outside edges of the book and nothing goes beyond that point. If your whole book looks something like this, your book does not have or need bleed.

Does not need bleed.jpg
Does not need bleed 2.jpg

As soon as you have any image or graphic that goes off the edge of the page, your book file needs bleed. As you see on the spread below, the grey fade and the fading photo both go off three sides of the spread. That means that this file “bleeds”, or at least, it should.

Needs bleed.jpg

This book was built with 0.125 inch or 0.3 cm bleed around all edges of the page. The printer will cut on the yellow (“trim”) line, but print on a paper that is larger. The graphics “bleed” (extend past the edge where the book printer will trim the pages) which allows the images to print right up to the edge of the page without leaving an awkward white border.

Needs bleed - added.jpg

Here is another example of a book spread that needs bleed on all sides.

Needs bleed 2.jpg

As you can see below, there is extra image around the edges of the page. In some areas it is more than 0.125 inches, but that is fine—the software will only export as much bleed as it is told to export. The area that is shown with a faded yellow border over it is the area that is the true 0.125 inch bleed zone. The rest is extra and it’s OK.

Needs bleed - added 2 just this much.jpg

How do I make sure my book file has bleed?

In the commonly used word processors like Microsoft Word or Apple Pages there is no real support for bleed. The best you can do is create a file that is 0.125 inches larger than the actual page size in every direction (and keep in mind that that part of the paper/design will cut off). So an 8.5x11 inch page would be set up as 8.75x11.25 inches in Word or Pages, and the printer needs to be given very clear instructions as to the final size and where to cut the printed piece. The same thing must be done in Adobe Photoshop, because although it is professional software, it is not really created for page layout.

Screenshot 2021-01-30 at 23.46.04.png

Adobe InDesign and other professional page layout or design software makes it possible to set up bleed when the document is being set up. When exporting PDFs for the printer, you may have to make sure the bleed setting is selected for the PDFs to have bleed in them. The screenshot shown here is taken from Adobe InDesign, where it is easy to put the appropriate bleed settings into your file. The ability to build bleed into your file from within the software also exists in Adobe Illustrator or Microsoft Publisher. Canva and Adobe Acrobat should also allow you to add bleed to your files.

If you are working with a professional book designer, you don’t need to worry about bleed, because your designer will set it up for you. You just need to understand what it is, in case your printer asks you if your book has it! To have a designer or printing company fix a book file for you by adding bleed to it after it has already been created can be fairly time-consuming or expensive if it was not created in professional software or if you don’t have the original, editable book files. It’s best to use professional software and/or work with a professional from the beginning of your file set-up, to avoid expensive “repairs” to your file before printing.

Amazon KDP, IngramSpark or my printer is asking me if my book interior has bleed. How do I answer?

If your book has any text, graphics, photos or images that are supposed to go off the edge of the page, then your book has bleed! This includes small details like a line that runs off the edge of the page or a shaded box that should go up to the edge of the page. And even if only one of your interior pages has bleed, you just say “yes” to the question.


Now you know what the term "bleed" refers to in book design and layout! It’s an important but little-known term outside of the design and printing specialities. Without it, your book may not look like you were expecting it to look! If you have any further questions about book design or set up, contact me!

How Can I Prepare an Out-Of-Print Book For Reprinting Digitally?

The author of successful interior design book series wrote to me with a quandary: she’d like to re-release several of her most successful books through Amazon KDP (Print-on-Demand / POD) but her books were printed around 1997, before the digital age. She has no digital files for the photos or book layouts. The printer destroyed the film they used to create the print layouts before offering that she could purchase it. But some of the books are still selling well, and she’d like to reprint them. She wrote asking for an affordable, realistic solution for getting her books recreated and back onto the market.

What follows is what I recommended for her book, in case it helps any others who are trying to bridge the gap between an analog or pre-digital book and today’s digital printing / print-on-demand market.

(Also, note to all printers: don’t throw away an author’s film before asking him or her first!)

Photo by wu yi on Unsplash

Photo by wu yi on Unsplash


The analog book layouts need to be rebuilt digitally and once this format is achieved, they should be good to go for a long time. The same digital format should work whether you print them on Amazon or run a full offset printing of the books somewhere else. It’s really important to make sure the price you get for re-laying out your books includes you receiving a copy of the working/editable InDesign files (not just the print-ready PDFs) at the end of the project, so you can have those files for any future edits or reprints. 

File Preparation

In order to set up the books for printing, I would need:

  • All the text (including cover, spine, copyright page - everything) in a flowing / editable text file format (Word). The formatting can be very simple (it would be helpful to have bold and italics already implemented, but headers, etc. don’t need to be formatted in any special way, since it is clear from the previous book what formatting is needed. 

    • If you don’t have an original digital copy of the text, OCR scanning should be able to capture most of it (scanning with character recognition turned on, ie: scanning the book pages) but it would have to be checked very carefully before being submitted for layout for any errors.  

  • All the images scanned from the originals in high resolution format. (For print, images need to be at least 300dpi at final size). If the images need color correction, retouching or to be cut to white, this should be done already before the book layout begins. I have a high quality photo editor that I can recommend if you need this. 

  • Any logo images or other graphics other than photos and text, in high quality format.

  • A pdf or some kind of scan of every page of every book, that shows a clear page edge on at least two sides so that we can match everything, including margins.

  • The fonts in digital format. I can probably find the names of the fonts if needed, but purchasing them would not be included in the layout costs.

Layout Process

  • I would ask to have one copy of each book (from the last, pre-digital printing) sent to me before the layout begins so that I can more easily check layout visually.

  • I would show you a sample of the first ten pages of the book and then proceed with full layout.

  • Cover and pages would be laid out to match the previous book exactly, unless you need any errors corrected or updates made.

  • Solid ink colors (like the colors of the titles, or solid color backgrounds) would be matched as closely as possible to the printed book, but then could be checked through ordering a sample of the POD book through Amazon KDP. (Color matching with POD is not an exact process. Each book is printed at a different place or at a different time and the color can vary.)

Layout rate

I would charge for this project on a per page rate, with the minimum order size being one full book. In order to give an official estimate, I would need to see the full scan of every page of the book. My price includes cover set-up, two hours of changes to the book after full layout, and final print-ready and editable files .


If you have a similar situation, with an out-of-print or almost out-of-print book that you want to get back into circulation, send me a message. Whether or not you work with me on the final layout, I’m happy to answer any questions you have about getting your book back into circulation.

What Does Book Interior Layout or Book Interior Design Cost?

When you are researching the cost of a book interior layout online, it can be hard to pin down an exact price. Why is this? It is because your book is unique! Simply providing a word count and the genre is not usually enough to secure an price, because there are so many variables that affect the time your book designer will invest in making a professional layout. Book designers need to see the manuscript, or at least a significant sampling of it, before quoting an exact price.

book interior layout pricing.jpg

Here are the main factors that come into play in book interior layout pricing:

Text

  • What is the word count?

  • How neatly is the source file formatted? (If the source file from Word is already formatted using paragraph styles, etc. this can ease the final formatting process.)

  • How simple or complex is the manuscript? (For example: cookbook vs. novel. A novel generally has just a few different styles, but a cookbook is much more complex with small subsections of text regularly being formatted different ways.) Variables that affect complexity include:

    • character styles like bold or italic text

    • headings (chapter titles, subheadings, sub-subheadings)

    • quotations, verse, poetry

    • boxed text or pull quotes

    • forms or tables

    • endnotes or footnotes

    • indexes

Images or Diagrams

  • How many images or diagrams are there?

  • Do any of these images still need to be created, edited or adjusted, or will they be provided to the designer ready to insert?

Timeline

  • When will the final manuscript be ready for formatting?

  • How soon do you need the professionally prepared print-ready PDFs to be delivered?

Revisions

  • Does the number of revisions required exceed the number of revisions the book designer quoted on? (The best way to avoid this is to have the book proofread multiple times before layout begins.)

As you can see, there are a lot of variables that play into the cost of your book interior layout! If you have a book manuscript and are looking for a book interior layout quotation, fill out this questionnaire and send me your manuscript for an exact quotation, or book a free consultation with me!

Should I Print With an Online Printer or a Local Printer?

In the past ten years, online printers have exploded and become the go-to for many print projects that used to be printed down the street. Sure, online printers are usually cheaper, but does that mean they’re always to be favoured over local printers? As I’ve researched various printing options for clients both in North America and Europe, it’s become clear to me which projects are well-suited to online printers, and which would be better printed locally.

Photo by Kaboompics .com from Pexels

A local printer may be best for:

Creative or complex print projects requiring personalized service: Printing with a local printer lends itself to creative print projects with unique shapes, papers, folds, or finishes. Not only can you get in-person advice from someone who can help you plan your project, but you can flip through paper samples or look at ink swatches in person. Typically, online printers are set up best for standard projects in standard sizes, which is one of the reasons they tend to be more affordable. 

Print projects with a tight turn-around time: As I mentioned in my post on saving money when ordering printing, when printing with an online printer, if you need the printed piece to arrive quickly, you will pay premium prices for rush production and overnight delivery. In this case, I almost always recommend printing with a local printer; you can pick up the printed pieces yourself if needed. It’s also faster to shoot your local printer (with whom you already have a relationship) an email with the necessary instructions and a pdf attached, than to create an account with an online printer and go through all the steps to set up the order to their specifications.

High-ticket print projects: For a project where the colours need to match exactly or you are quite particular about how the photos are printed, printing locally with a more traditional full-service printer is best. You may even be able to “press proof” if needed — to make an appointment with your local printer to be there when your project is being printed, to sign off on the prints as they leave the press.

It follows that an online printer may be best for:

Standard print projects with standard lead times: If you need a 3.5 by 2 inch business card (in North America) or an A6 postcard (in Europe), any number of online printers are begging for your attention. Most of them will probably do what you need them to do. If you have about 1-2 weeks lead time, most online printers can print and deliver at their standard reduced rates. When working with an online printer, there is usually no interaction with a customer service representative, and it can be a bit harder to get help with questions or complaints. 

Low-budget print projects: There are always clients for whom budget is of utmost concern. For these projects, planning them to suit an online printer’s standard product is your best bet. For example, recently a client wanted a 6 by 6 inch marketing booklet. An online printer offered that exact size, and the local printer could not compete with the pricing because the size was unusual and the booklets would have had to be put together by hand. 

As someone who cut her prepress teeth at a local printer, I am a fan of giving back to the local economy when possible, and not contributing to the closure of yet another local print shop. But like everyone else, I’ve printed with both types of printers. One last secret about local printers though — because you’re dealing with a real human with whom you have some kind of relationship, you can also ask if there’s any way he or she can meet your budget or price match another printer. With a local printer there’s a bit more “give” — they’re happy you want to work with them.


As a graphic designer who specializes in print design, I’m available to source or recommend printers for my clients. Whether you’re needing print design or print sourcing, let’s talk!

What Is the Best Way to Save Money When Ordering Printing?

While getting printing quotes and ordering printing for a client in the USA this month, I have been thinking about the best way to save money when ordering printing. Even if the money being spent on printing is not coming from my pocket, I hate to see clients paying double or triple as much for a print project simply because they don’t have this one thing. Can you guess what it is?

Photo by rawpixel.com from Pexels

Photo by rawpixel.com from Pexels

[Photo added to build suspense.]

Saving money when ordering printing is easy if you have time. The top reason that I see printing become expensive for clients is because they haven’t planned enough time for the most affordable printing options. In other words, print projects need to be planned well enough in advance by someone who knows what a reasonable printing timeline is.

Let’s say you’re ordering 5,000 postcards. Printing at the printer down the street might cost twice as much as printing at an online printer. But if you have to pay rush fees and express shipping for your print job at the online printer in order to get the project to you on time, you might as well support the local economy and send your project to the printer down the street, because you’ll end up paying almost the same thing. Planning print jobs with enough time to print them affordably can easily save hundreds of dollars even on a small project like postcards.

The savings become even greater if you are able to plan printing overseas into your timeline for larger projects or larger print runs. For example, that full colour cookbook that might cost $15,000 to print in North America might cost $6,000 to print in India or China…but you need to plan on at least an extra four to six weeks for printing and delivery. And even with printing overseas, shipping can become expensive if you suddenly have to have a quarter of your order sent by air instead of by sea because the timeline is too tight.

If you have time, you have choice. A bit of planning also gives you the time to:

  1. Gather quotes from more printers, finding the best price or quality for the price.

  2. Research other options that might also save money, like different papers or different formats.

  3. Negotiate with the printer that you hope to work with. (This is a benefit of working with a local printer, is that you may be able to negotiate with them and keep your printing local.)

  4. Wait for sea or ground delivery instead of air or overnight.

  5. Work with your designer in a low-stress way and avoid rush fees from the designer as well.

For a big corporation, saving $100 when ordering postcards or $2,000 when ordering books might not seem like much. But these kinds of savings are especially important for lean start-ups or organizations like non-profits for whom every penny counts!

So, what’s the best way to save money when ordering printing? Good planning — that is, knowing how much time you need to keep the print project from becoming a rush order!


Thank you for taking the time to read this post! I am happy to help clients source the best printing prices in their neighborhood, online or overseas. If you want to talk about how to save money on your next print project, please write to me through my contact page.

Why Don’t You Offer Free Book Interior Layout Samples?

To my surprise, this scenario has repeated itself three times in the past year:

  1. A potential client will inquire about a book interior layout project.

  2. I will spent a considerable amount of time learning about the project so that I can bid on it.

  3. The potential client will tell me that he or she was expecting a “free sample layout” first.

For example, a British client asked me a few months ago what I would charge to create four sample design spreads for his coffee table book. I spent several hours working for "free" (reading his inquiry, corresponding with him, Skyping with him, learning about him and his project). Then I sent him a price. This was his polite, but unexpected, response:

"...you are competing with one designer offering sample work free, and another charging $12 per page - would you like to reconsider your approach to the sample work?"

Let’s just say that I wasn’t charging anywhere near $12 per page. I didn’t budge on my price, and I didn’t get the project.

Asking someone to begin their work with no promise of payment sounds strange in almost any other industry. But somehow it has become “acceptable” in the online world of freelancing and graphic design. Design crowd-sourcing websites have given some clients the idea that designers can afford to work for free, and unfortunately, many graphic designers succumb to competing for business by beginning a project with absolutely no guarantee of being paid to later complete the project.

Imagine the same scenario, but in the restaurant industry. When you go out to eat, you don't ask five or six restaurants to make you an appetizer for free, sample all the appetizers, and then pick which of the restaurants will be honored with your purchase of an entrée. I mean, maybe you love sampling a wide variety of appetizers. That’s completely fine, if you want to pay for your appetizers at each of those restaurants, as a test of the quality of their cuisine!

No one expects to be fed for free at a restaurant, and I guess that’s why it always surprises me that anyone would expect to be “fed” graphic design for free either. So for the record, here’s why I don’t offer free book interior layout samples.

I don’t offer free book interior layout samples because…

  1. …the initial stage of your book layout is the most time-consuming and most important stage.

During the first stage of a book project, your designer is making both technical and design decisions that can make or break your project. Having a professional final product takes good thinking and planning from the beginning, both in image-heavy books and in simple text-based layouts. Settings related to typography (justification, kearning, leading) and layout (margins, graphics, colours, styles) are all made at this stage and set the course for the whole project. Errors or oversights at this point can cause expensive problems at the end of the project.

In the case of the client above, his coffee table book was going to have stories of significantly different lengths with photos accompanying them. No matter the length of the story, he wanted each story to take up only two pages, or one spread. This takes a lot of planning, to be sure that the design created will be flexible enough to suit such different types of content.

2. …I want your book to be unique.

Most designers who offer "free layout samples" have a one-size fits all template that they use and update for each new book. But as I mentioned above, there is no one-size-fits-all with truly professional book interior layouts. A true designer will treat your book like the unique project that it is, and consider how everything from the typeface selection to the placement of headers and footers suits your book’s genre or audience.

3. …designers doing free work ultimately can’t give as much time and attention to paid work.

Another reason I don't create book layouts for free is so that ultimately, when I do create books, I have the time and focus to deliver above and beyond what I have promised. I don’t have to rush through paid work to make time for the free work I’m trying to fit in to my schedule as well. When a client comes along who understands the value of my work, I'm not busy messing around with unpaid projects. I can complete the work I've promised — and more — within the deadlines. Because professionalism in pricing usually carries over to professionalism in business as a whole.

4. …no book designer should feel they need to work for free.

Sometimes refusing to do free sample book layouts feels a bit like running the only restaurant on the street that doesn't offer free appetizers. But as I take a stand against requests for free book interior layout samples, I educate clients and hopefully help fewer other designers to receive the same kinds of unprofessional requests. If other designers begin to do the same, maybe we’ll receive fewer of those surprising questions: “Would you like to reconsider your approach to the sample work?”


I don’t offer free book interior sample layouts, but I do offer free estimates. Learn more about my process here. Whether you’re an established publisher or self publishing for the first time, let’s talk about your next book interior layout project.

Where Can I Find Free, High-Resolution Images for Print Design?

Photo by JESHOOTScom via Pixabay

Photo by JESHOOTScom via Pixabay

In the past five years, there's been a real boom in websites offering high resolution, print-quality photos that are free for commercial and personal use. Whether you're wanting photos for a professional print design project or even just looking for a beautiful new photo to enlarge for your office wall, check these websites before you shell out the cash for paid photo services.

1. Unsplash

The first place I look if I want non-cheesy, free, high-resolution photos is Unsplash. The images at Unsplash are well curated, and have a young, artsy vibe. They're high enough quality for printing and Unsplash doesn't require that you start an account with them to download images. All images on Unsplash are free for commercial or personal use. Another nice feature of Unsplash is that there's little advertising on the website; the same can't be said for most of the following photo sources. I like Unspalsh so much that I sometimes even contribute my own photos to the pool for others to use. 

2. Stocksnap

Stocksnap is another great gallery to search for quality, high-resolution photos at no cost. Similar to Unsplash but a bit less hipster. They offer alle of their images under the same CC0 license that lets you do what you want with their photos, with no attribution required. The quality of the images is sharp and good for print at most sizes. You can read their image licensing details here

3. Pexels

Still searching for that perfect image? Enter your keyword(s) into Pexels and press enter! Pexels specifies that their images can be used in print marketing material: "Use the photos for flyers, postcards, invitations, magazines, albums, books and more" but be sure to read their licensing write-up here before you hit print!  

4. Pixabay

Not to be confused with Pexels (the "p" and the "x" in both names still throws me off), Pixabay advertises that they have over 1.5 million royalty free stock photos and videos. Pixabay requires that you create an account and log in to access the images in higher resolutions, but it's worth it if they have the image you're wanting! 

juliekarenblogdivider.jpg

Of course, there are many more such websites, but I hope these four favourites of mine will be useful to you! It's always good to have a few different links go-to free stock photo websites in mind when you need images for a project, because particularly when it comes to free stock images, not every site will have the image you need.

If you can't find the image you're wanting for free, try a cost-effective source of paid images like Shutterstock.

Lastly, I can't emphasize enough how important it is to check and double check the licensing on "free" images before ordering a large print run using those photos. Free print-quality stock images can be a great solution in many situations, but watch for my follow-up post, where I explain why (in my opinion) you should never use a "free" image on your book cover, or front and centre in any other important, widely-distributed print marketing piece. 


Wondering about using an image for print, but not sure if the resolution is good enough? Give me a shout through my Contact page and I'll help you figure it out! Or sign up for my Book Done newsletter to get tips and stories to help you get your book project done!

What Does the Term “Spread” Refer to in Book Design and Layout?

Some of my clients are making their first foray into the world of printing and publishing when they come to me, and as we discuss their project, I realize that there are terms I use regularly that they have never heard before. This week when we were discussing a sample layout for a book project, my client asked me what a "spread" refers to. It takes only about ten seconds to explain, but can make a big difference in discussing a project.

In this image, I've highlighted a page:

book spread design and layout.jpg

And in this one, I've highlighted a spread:

design book spread.jpg

See, that was easy. A spread is simply a set of pages (usually two) viewed together. It's how you see the book or magazine when it's open and both pages are showing.

As someone working with a book designer or print designer, it's good for you to know the difference. Why? Well, especially in layouts where the text and/or images are spread across both pages, you must see your proof in spreads to get the full effect of the design. 

If your designer sends you a PDF proof where the pages are shown individually, you can write back and ask if it's possible to also see it in spreads. After all, the final book will virtually always be seen as spreads, and when you can see it on screen in spreads, it gives you a much better idea of how the layout will strike the viewer visually. It may also help to you catch layout errors more easily.

In InDesign, whether a "print PDF" or "interactive PDF" is being exported, there's an option to export it as pages OR spreads. Here are a few screenshots:

export print pdf as spreads.jpg
export a pdf as spreads from InDesign.jpg

If you understand the difference between a spread and a page, you can have clearer conversations with your designer about your expectations for the project and the proofs.

Please note: receiving a PDF of your book as spreads is important for visual effect, but receiving a PDF of your book as individual pages is essential for the actual printing process. You will still want to have an individual pages version of the proof: 

  1. If you are wanting to print off the proof your designer has sent to you, to proofread it (always recommended - you catch a lot more errors on a printed proof), or

  2. For sending to your printer or publisher.

Now you know what the term "spread" refers to in book design and layout! And you even know where the option is in InDesign, to export the PDF as individual pages or as spreads. I remember a time when InDesign did not offer the option to export PDFs as spreads, but it's been a great addition to the software and definitely helps the client viewing a PDF proof to picture how everything will work together visually in the final, printed piece.


Sign up for my Book Done newsletter to get tips and stories about getting your book project done!

Why Does the Paper in My Printed Proof Feel Different Than the Paper I Specified for My Project?

A few months ago, after a client received a printed proof of his catalog in the mail, he asked me: Why does the paper in my printed proof feel different than the paper I specified for my project? He had reason to be concerned: the thick paper on which the proof had been printed did not open very well, meaning a lot of each beautiful photo spread was lost to the centrefold of the book. He sent me a video to show me how stiffly the pages of his proof were turning. 

Plotter - the kind of device your proof is printed on (Image Source)

Plotter - the kind of device your proof is printed on (Image Source)

Thankfully, the printer and I were both able to reassure him that the paper the printer uses for proofing a project, especially a project that is printing on special paper or on an offset press, is usually not the same paper the final project will be printed on. At the commercial printer where I used to work, our proofs were printed on rolls of paper by a digital plotter, but the final paper came in cut sheets and was loaded into the sheet-fed offset press.

Offset Press - the kind of device your final product is printed on (Image Source)

Offset Press - the kind of device your final product is printed on (Image Source)

Usually, the first time you'll get to see "your" artwork on "your" paper is when the final product is delivered to your door. But that's why a full-service printer will usually send a sample of the paper to you separately (in the case of my client's catalog, the printer had done this months before), so that you can know the exact thickness or feel of the final paper. If it's really important to you to know how the product will feel — after all, it's hard to hold one sheet of paper and imagine how 200 such sheets will feel in a book — you can ask the printer to provide a dummy of your project. A dummy is a blank book made of your final paper(s), cut and bound to final size. It still won't have your graphics on it, but it will give you a real idea how your piece will feel in your hands.

Next time you get a too-shiny, too-thick proof in the mail, remember: your proof is rarely printed on the same paper as your final product. It's OK to double-check with your printer or designer to make sure the right paper is specified for the project.  Then, take a deep breath, approve the proof, and trust your printer on this one!


If you have a print-related question that's puzzling you, let me know through my Contact page and I'll do my best to find you an answer! 

Should My Photo Be on the Front Cover of My Book?

This week a client of mine who is self-publishing a cookbook wrote to me with this question: "Should my photo be on the front cover of my book? Everybody says yes....[but I am not sure.]"

When I replied to her, in essence I told her two things:

  1. Having your face on your book's front cover is atypical in your genre. Looking at other cookbooks in the clean eating or vegan genre, I knew that it is not standard practice to have the creator's photo on the front.

  2. Sometimes having an atypical cover can make your cover win, but often it can make it lose. The decision to make an atypical cover needs to be a decision made for a deliberate marketing reason.

I went on to explain that the choice depends a lot on her businesses' branding. For example, if her business is very much about her face, her personality, her look, etc. then it might work well to put her face on the cover to further cement that idea that she is the one creating the recipes. However, if she doesn't show photos of herself a lot in her marketing, and focuses more on photos of her culinary creations, it would probably be better to do the same in her cookbook cover design...unless she's gearing up for a big change in her marketing methods.

Photo by Dan Gould

Photo by Dan Gould

After having written to her with my thoughts, I found two other answers to similar questions online, which I thought were worth sharing here. 

This insight is from Hobie Hobart:

Is it ever a good idea to put your picture on a book cover? 
This is contingent on many factors so the initial answer is, it depends. It IS a good idea, and nearly mandatory, to use your picture on the front cover if you are a Barack Obama, an Oprah, or a renowned superstar. Many authors think that putting their picture on the front cover will make them famous. This is not necessarily so. Unless you are well known in the media, bookstore buyers will not accept your book which pictures you on the front cover. However, if you are selling exclusively to a tight niche where you are well known, or your intention is to start branding yourself to a specific market, your photo on the front cover or the spine can be an advantage.

This is how Michele DeFilippo answered this question:

Should I put my own photo on my book cover? 
It depends. If YOU are the product, then your picture can absolutely be used on the front cover (think Dr. Phil or Suze Orman). If your book is non-fiction, you are a well-known expert in your field, and buyers would recognize your face, then your picture can be used on the back cover, along with a bio. Otherwise, your picture and bio belong in the back matter of the book.

Ultimately the answer is, "It depends!" But often the answer is, "No." Think carefully about your market and your branding before deciding to put your photo on your book cover.


Thank you for looking at this post! If you have a question about your book project that you'd like me to answer, leave a comment below, or write to me through my Contact page. 

How Can I Catch More Errors in My Book Manuscript or Print Design Documents?

This week I received a nice marketing email, and I followed a link in the email to a blog post. I didn't read the whole blog post, but this I did get out of it: the writer had written "check" where it should have said "cheek" — and that was my main takeaway. Probably not the takeaway that the author was intending. 

We've all been in those situations where a typo slips by us. When you are preparing files for print, catching typos and mistakes is even more essential than when preparing text for online media, where content can be corrected with just a few clicks. (I wrote back to the company who had sent me the marketing email, and within half an hour the typo was corrected.)

I won't claim to produce completely error-free print files, but here are a few tricks I've learned to get as close to perfect as possible.

Photo by Jonas Jacobsson

Edit text in software that has automatic spelling and grammar check (and make sure it is turned on). 

If you're typing or writing more than just a few words, make sure to start in a program or browser that provides basic spelling and grammar check. This sounds obvious, but it's easy to start typing in a software that's not flagging any errors. This is your first and easiest error safety net.

In higher-end design software, the option to automatically underline misspellings or grammar mistakes is not necessarily activated. In Adobe InDesign this has to be turned on under Main Menu > Preferences > Spelling. Adobe Illustrator and Adobe Photoshop are not text editing programs, but some people use them that way. They do not provide the option to automatically flag misspelled words; you actually have to manually run a spellcheck (Edit > Check Spelling).

The best option is to always start your typing in a program or software that provides spelling and grammar check, especially if you are not a native speaker of the language in which you work.

Get your computer to read your text to you.

Another helpful tool for catching mistakes in your text is getting your computer to read the text to you. If the author of the blog post I mentioned in my opening text had listened to her article, she definitely would have heard the difference between "check" and "cheek", but it was not a mistake a spell check could have picked up. I have used the free version of the software Natural Reader for this, but usually I just highlight the text on my Mac, right click, and select Speech > Start Speaking. I did it for this blog post, as well, and definitely caught some of those tricky typos.

Proofread a printed version of your document. 

I've heard that we notice 25% more errors when we proofread printed documents than when we proofread on screen, and I believe it. Printing out your document also helps you notice formatting issues — like a font that is too small, or text that is printing too close to an edge that will trim. When I lay out books for my clients, I often encourage them to print out the full proof and read it over in print, no matter how many times they've already read the manuscript over on screen. (And when you're done with that printed proof, please, recycle the paper.)

Ask at least one "uninvolved" person to proofread.

When deadlines are tight, it can be tempting to overlook this step. But any document can benefit from being looked over by another set of eyes. Sometimes you need to outsource the proofreading to a professional. Or just ask someone else who is a bit less involved in the project to read it over with fresh eyes. Last year, at the last minute a team member who had not been very involved in an important project was asked to help with the final proofread. He noticed that the text on the spine of our book was running in the wrong direction — an important detail that four or five of us who were more involved in the project had missed. 

Order a printed proof from your printer. 

While small or low-cost projects might not necessitate ordering a printed proof, for any print project with large amounts of text or that costs a lot of money, it's good to build enough time and money into the project to order a printed proof (in addition to the now-standard PDF proof). The printed proof can help you to recognize technical, visual or formatting issues that would never have come to your attention in a PDF, as well as any proofreading errors. For example, on a recent $10,000+ print project, I was so glad when the printed proof showed us that there would be a score line on the cover that would go directly through the company's logo. This gave us the chance to adjust the position of the logo — it was the only change we made after seeing the printed proof, but a change that made a big difference in the quality of the final product. 

No one's perfect! But the closer you can get your printed piece to perfection, the happier both you and your team or client will be! I hope these tips give you a few new ideas for catching errors in your writing and designing for print, before it goes to press!


Are you writing a book or preparing a document for print? Ask me a question through my Contact page.