
Do you want to write a book? Do you regularly post on social media? Your book’s content may already be half ready, ideas just waiting to be pulled together from Facebook, LinkedIn, or Instagram in a cohesive format for print. In the following post I explain how a client of mine used Facebook posts to build a memoir. Whether you’re writing a memoir, a travel journal, a business book, a marketing book — don’t forget how much content you may already have available to you on your social media accounts.
A few years ago the publisher of Notes from Susie asked me to provide interior design and layout for a memoir about a lovely woman named Susie. Susie was a prolific note-writer, and when cancer made its presence in her life known, she and her husband took to Facebook to keep her friends and family updated about their battle. Besides sharing what was going on, they shared a lot of lyrics to beloved songs in their posts.
Celebrating Grace, the publisher, pulled this story about grief, health, family relationships, music, and the Christian life together This book is an example of how a touching memoir can be assembled mostly from Facebook or social media posts.
Here’s how you can compile your own book from social media posts.
1. Gather all the information you want to include in your book from your social media account(s).
Copy and paste the text of each individual post that you want to put into your book into a Word document, in chronological oder. This can be a tedious job, and if you are sifting through a huge number of posts, you may want to hire a freelancer to do this busy work for you.
Note the date (and time, if important) of the posts, and if various voices are used, be sure it is clear which person is writing in each post.
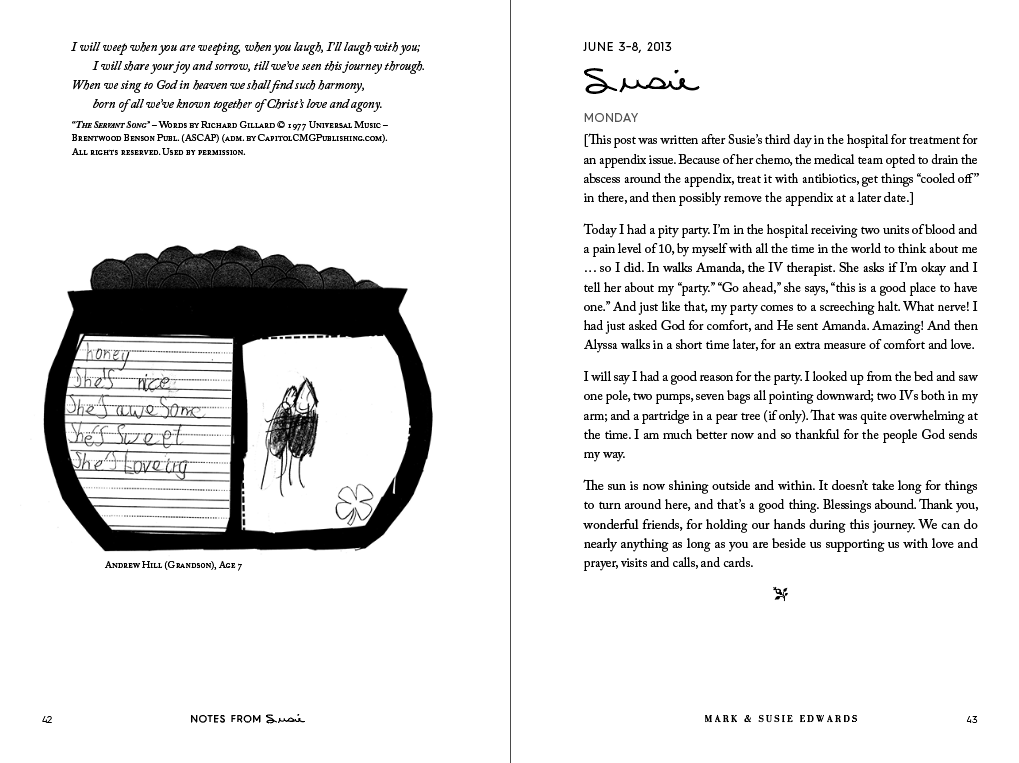
(You can see below that Susie’s posts were organized chronologically in her book, and had date ranges as headers, and days of the week as subheaders.)
Download and save any images (or make screenshots of any other visuals) from your social media accounts that you want to include. Label these in such a way that it’s easy to find which text they relate to.

2. Decide on a structure for your book.
Consider how best to organise the information from the posts in a way that would be understandable to the reader: chronological, thematic, by voice…. Your story will dictate which order or structure makes the most sense.
Susie’s story was told chronologically, with introductory and concluding material surrounding her and her husband Mark’s notes and posts, which make up the bulk of the book. The breakdown is like this:
Front matter (foreword, acknowledgements, general introduction and introduction to Susie);
Susie’s story (Susie and Mark’s posts, organized chronologically, and divided into three parts)
Back matter (epilogue, reflections from Susie’s children, credits, and reviews).
Don’t hurry this process; having a solid and logical structure to your memoir is one of the most important aspects of making your book clear and easy to follow.

3. Edit your story and decide on a title.
Edit and rearrange your material to suit the structure you’ve chosen. It doesn’t make your memoir inauthentic if you have to remove a few posts or add some explanatory material between posts to make them flow. As long as you keep the different kinds of text organized in your file (post, introduction, explanatory paragraph, footnote) your book designer can help you make instantly obvious which parts are which, through smart formatting. As you edit your story, note ideas for the title of your book!
In Susie’s books, the songs had special formatting, as well as pull quotes, copyright lines, etc.

4. Add visuals or meaningful touches.
Collect photos to support your story.
Scan or collect photos in the highest quality possible, so that they will appear crisp in print.
If you are taking photos of memorabilia for the book, set the objects on a plain white background and be sure you have even lighting (no strong shadows) before shooting the pictures.
If you are using representative photos from the internet, make sure you have permission to use the images you select, and that the images are high quality. Here are some ideas about where you can find free, high quality images for your book.
You may want to insert your images into your Word file, so that you have a visual of where each one appears, but Word will compress the quality of your image. For this reason, be sure to also keep a folder with all original high-quality images in it, for your book designer. Before your story and images are handed over to your book designer, you should note in the Word document where each photo should be inserted. (For example, simply write “Insert Photo404.jpg from folder ‘Early Years’ here.”)
Scan handwritten notes or paper memorabilia to sprinkle throughout the book. Because Susie was such a note writer, her book has quite a few notes from her, and a few notes to her. As always, be sure to scan at the highest resolution possible on your scanning device.

Add meaningful quotes or other fun touches. Remember to acknowledge the sources of any quoted material, and remember that that if you are quoting extensively from other writers’ work (poetry, prose, lyrics), you need to check if you have permission to reprint that content. (Don’t be like the self-publisher I ran into many years ago, who informed various musicians after printing that she had included their lyrics in her book! She thought they’d be delighted. Instead, one musician threatened to sue her, and his lawyer required the author to cover the musician’s lyrics in each copy of her book with a sticker!😢)
5. Get someone else to edit and/or proofread your content.
Once you’ve organized and edited your memoir text and content, it’s time to ask others for their input. Even if you’re just planning to share your book with a handful of family members, be sure to at least have one objective set of eyes go over your entire manuscript. You’ll be surprised how many little typos slip by you when you’re familiar with the story!
If you’re planning to release your book to a wider audience, be sure to have it professionally edited and proofread (these are two separate tasks). If you request it, your editor can also check the accuracy of things like quotations, titles or dates.
6. Make decisions about final format, printing, book designer, etc.
At this point you’ll need to consider where and how you want to print your book, how many copies you need, what your page size will be, etc. You can ask your book designer for advice on these topics if you’d like.
Once your text and images are as finalized as you can get them (and proofread one last time!), it’s time to hand them over to your book designer and her work her magic on the cover and interior design! (Note: usually the designer can start on the cover before the interior is completely finished, if you’d like to get a head start, but the title does need to be finalized before cover design can begin).
Check out my client questionnaire if you’re wondering what kinds of things your designer needs to know to help you with a book cover and book interior layout.
Notes from Susie is a lovely example of how digitally-recorded writing and images—which would be otherwise buried in a social media feed—can live on as a professionally-designed paper book! I hope this post has been helpful and inspired you to invest some time and creativity to make an unforgettable memoir for your family, friends, or wider community!
If you’ve gotten this far, you’re probably pretty keen to compile a book from Facebook or other social media posts! And I’m pretty keen to help you! If you’d like to tell me your story, I’m all ears: let’s talk. Or sign up for my Book Done newsletter to get tips and stories to help you get your book project done!